2. Creating and Deleting Files
All this time, we've had a
button in the lower-right corner of our toolbar just for the purpose of
sending our drawing as a PDF in an e-mail message. That's still a nice
piece of functionality, but we can do more with that space—namely,
replace it with a button that launches a small menu in another popover.
Let's start by creating yet another UIViewController subclass, once again a UITableViewController subclass with no .xib file, named ActionsMenuController.
Like some of the other view controllers we've made, this one defines a
notification name that's used when the user selects an item in the list
it's going to display. It also defines an enumerated type that will
show which of the menu items was selected. Here's the entire content of
both the .h and .m files:
//  ActionsMenuController.h
#import <UIKit/UIKit.h>
#define ActionsMenuControllerDidSelect @"ActionsMenuControllerDidSelect"
typedef enum SelectedActionType {
  NoAction = −1,
  NewDocument,
  RenameDocument,
  DeleteDocument,
  EmailPdf,
  ShowAppInfo
} SelectedActionType;
@interface ActionsMenuController : UITableViewController {
  SelectedActionType selection;
  UIPopoverController *container;
}
@property (readonly) SelectedActionType selection;
@property (assign, nonatomic) UIPopoverController *container;
@end

//  ActionsMenuController.m
#import "ActionsMenuController.h"
@implementation ActionsMenuController
@synthesize selection, container;
- (void)viewWillAppear:(BOOL)animated {
  [super viewWillAppear:animated];
  selection = NoAction;
}
- (BOOL)shouldAutorotateToInterfaceOrientation:(UIInterfaceOrientation)orientation {
  return YES;
}
- (NSInteger)numberOfSectionsInTableView:(UITableView *)tableView {
return 1;
}
- (NSInteger)tableView:(UITableView *)tableView numberOfRowsInSection:(NSInteger)s {
return 5;
}
- (UITableViewCell *)tableView:(UITableView *)tableView
  cellForRowAtIndexPath:(NSIndexPath *)indexPath {
  static NSString *CellIdentifier = @"Cell";
  UITableViewCell *cell = [tableView dequeueReusableCellWithIdentifier:CellIdentifier];
  if (cell == nil) {
    cell = [[[UITableViewCell alloc] initWithStyle:UITableViewCellStyleDefault
      reuseIdentifier:CellIdentifier] autorelease];
  }
  switch (indexPath.row) {
    case NewDocument:
      cell.textLabel.text = @"New Dudel";
      break;
    case RenameDocument:
      cell.textLabel.text = @"Rename this Dudel";
      break;
    case DeleteDocument:
      cell.textLabel.text = @"Delete this Dudel";
      break;
    case ShowAppInfo:
      cell.textLabel.text = @"Dudel App Info";
      break;
    case EmailPdf:
      cell.textLabel.text = @"Send PDF via email";
      break;
    default:
      break;
  }
  return cell;
}
- (void)tableView:(UITableView *)tableView didSelectRowAtIndexPath:(NSIndexPath *)indexPath {
  selection = indexPath.row;
  [[NSNotificationCenter defaultCenter]
    postNotificationName:ActionsMenuControllerDidSelect object:self];
}
@end
Switch over to DudelViewController, where we're going to make some slight changes:
Add this to the instance variables:
IBOutlet UIToolbar *toolbar;
Remove this action method:
- (IBAction)touchSendPdfEmailItem:(id)sender;
And add this action method:
- (IBAction)popoverActionsMenu:(id)sender;
Open DudelViewController.xib
in Interface Builder, and select the button farthest to the right in
the toolbar. Open the Inspector panel, clear out the Title field, and
set the Identifier to Action. Then control-drag from the button to DudelViewController, and select the popoverActionsMenu: action. Now save your work, and go back to Xcode.
We'll need to make some changes to DudelViewController.m to match the header file's changes, and to handle this new menu controller. For starters, add this near the top:
#import "ActionsMenuController.h"
Then create the following methods:
- (IBAction)popoverActionsMenu:(id)sender {
  ActionsMenuController *amc = [[[ActionsMenuController alloc] initWithNibName:nil
    bundle:nil] autorelease];
  [self setupNewPopoverControllerForViewController:amc];
  amc.container = self.currentPopover;
  self.currentPopover.popoverContentSize = CGSizeMake(320, 44*5);
  [[NSNotificationCenter defaultCenter] addObserver:self
    selector:@selector(actionsMenuControllerDidSelect:)
    name:ActionsMenuControllerDidSelect object:amc];
  [self.currentPopover presentPopoverFromBarButtonItem:sender
    permittedArrowDirections:UIPopoverArrowDirectionAny animated:YES];
}
- (void)actionsMenuControllerDidSelect:(NSNotification *)notification {
ActionsMenuController *amc = [notification object];
UIPopoverController *popoverController = amc.container;
[popoverController dismissPopoverAnimated:YES];
[self handleDismissedPopoverController:popoverController];
self.currentPopover = nil;
}
- (void)createDocument {
  [self saveCurrentToFile:[FileList sharedFileList].currentFile];
  [[FileList sharedFileList] createAndSelectNewUntitled];
  dudelView.drawables = [NSMutableArray array];
  [dudelView setNeedsDisplay];
}
- (void)deleteCurrentDocumentWithConfirmation {
  [[[[UIAlertView alloc] initWithTitle:@"Delete current Dudel" message:
  @"This will remove your current drawing completely. Are you sure you want to do that?"
  delegate:self cancelButtonTitle:@"Cancel" otherButtonTitles:@"Delete it!", nil]
  autorelease] show];
}
- (void)renameCurrentDocument {
  // hold on, we're not quite ready for this yet
}
- (void)showAppInfo {
  // not ready for this one, either!
}
// UIAlertView delegate method, called by the delete confirmation alert.
// we're only using one UIAlertView right now, so no need to check which
// one this is, just which button was pressed.
- (void)alertView:(UIAlertView *)alertView clickedButtonAtIndex:(NSInteger)buttonIndex {
  if (buttonIndex == 1) {
    [[FileList sharedFileList] deleteCurrentFile];
    [self loadFromFile:[FileList sharedFileList].currentFile];
  }
}
Then replace this:
- (IBAction)touchSendPdfEmailItem:(id)sender {
with this:
- (void)sendPdfEmail {
We need to add an additional check, which contains another bit of checking all its own, to our handleDismissedPopoverController: method, down near the end of the method (just before the return):
} else if ([popoverController.contentViewController isMemberOfClass:[ActionsMenuController class]]) {
    ActionsMenuController *amc = (ActionsMenuController *)popoverController.contentViewController;
    switch (amc.selection) {
      case NewDocument:
        [self createDocument];
        break;
      case RenameDocument:
        [self renameCurrentDocument];
        break;
      case DeleteDocument:
        [self deleteCurrentDocumentWithConfirmation];
        break;
      case EmailPdf:
        [self sendPdfEmail];
        break;
      case ShowAppInfo:
        [self showAppInfo];
        break;
      default:
        break;
    }
}
Now build and run your app,
and try that on for size! You can now both create and delete Dudel
documents, and switch between them. Each new document you create will
be given a default name containing a timestamp, to ensure its
uniqueness. All that's left to do now is to add the ability to rename
the files you create here, and to display a brief info panel with
another menu item. Both of these will be accomplished using modal
displays.
3. Renaming Files
First, let's get the
file renaming working. The idea here is that creating a new document
should be instantaneous, with the default filename working as a
placeholder until the time when the user decides to give it a name. At
that point, the user can invoke this functionality through the menu.
Start by making a new UIViewController subclass. This one will not be a UITableViewController subclass, and it needs to have a matching .xib file, where we'll define a simple GUI for renaming a file. Name this controller class FileRenameViewController. Here's the content of the FileRenameViewController.h file:
//  FileRenameViewController.h
#import <UIKit/UIKit.h>
@protocol FileRenameViewControllerDelegate;
@interface FileRenameViewController : UIViewController {
  id <FileRenameViewControllerDelegate> delegate;
  NSString *originalFilename;
  NSString *changedFilename;
  IBOutlet UILabel *textLabel;
  IBOutlet UITextField *textField;
}
@property (nonatomic, retain) id <FileRenameViewControllerDelegate> delegate;
@property (nonatomic, copy) NSString *originalFilename;
@property (nonatomic, copy) NSString *changedFilename;
@end
@protocol FileRenameViewControllerDelegate
- (void)fileRenameViewController:(FileRenameViewController *)c
  didRename:(NSString *)oldFilename to:(NSString *)newFilename;
@end
One of the new features
in iOS 3.2 is the ability to use presentation styles when displaying a
modal view. In older versions of iOS, modal views always filled the
screen, but here we're going to use a presentation style called UIModalPresentationFormSheet,
which presents a 540-by-620 view, centered in the screen, with the rest
of screen grayed out. This view slides in from the bottom of the
screen, and since it doesn't cover the entire screen, it's slightly
less jarring. Let's set it up now.
Open FileRenameViewController.xib
in Interface Builder. Select the view, and use the attribute inspector
to disable its status bar (as we've done for several other views in
Dudel), which will let us resize the view. Use the size inspector to
set its size to 540 by 620. Next, use the Library to find a UILabel and a UITextfield,
dragging each of them into the view. Switch back to the attribute
inspector, and set the font for each of those components to 24-point
Helvetica. For the UILabel, also set
its # Lines to 0, which will let it display text on multiple lines if
necessary. Then make them each nearly fill the width of the view, and
position them well above center (in order to leave space for the
keyboard), something like what you see in Figure 4. For bonus points, use the attributes inspector to set the text field's placeholder text to Entire Filename.
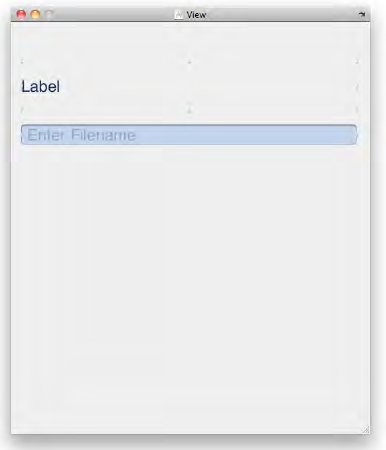
Now all we need to do is connect the textField and textLabel buttons from the File's Owner icon to the appropriate GUI components, and connect the text field's delegate outlet back to File's Owner. Save your .xib. This GUI is done!
Switch back to Xcode, and enter this code for FileRenameViewController.m:
// FileRenameViewController.m
#import "FileRenameViewController.h"
#import "FileList.h"
@implementation FileRenameViewController
@synthesize delegate;
@synthesize originalFilename;
@synthesize changedFilename;
- (void)viewWillAppear:(BOOL)animated {
[super viewWillAppear:animated];
textField.text = [[originalFilename lastPathComponent] stringByDeletingPathExtension];
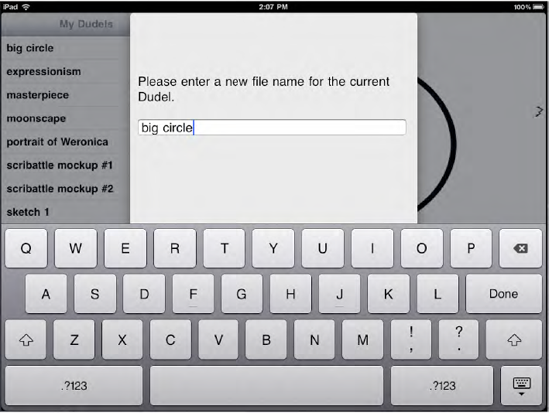
textLabel.text = @"Please enter a new file name for the current Dudel.";
}
- (void)viewDidAppear:(BOOL)animated {
[super viewDidAppear:animated];
[textField becomeFirstResponder];
}
- (BOOL)shouldAutorotateToInterfaceOrientation:(UIInterfaceOrientation)orientation {
return YES;
}
- (void)dealloc {
self.delegate = nil;
  self.originalFilename = nil;
  self.changedFilename = nil;
  [super dealloc];
}
- (void)textFieldDidEndEditing:(UITextField *)tf {
  NSString *dirPath = [originalFilename stringByDeletingLastPathComponent];
  self.changedFilename = [[dirPath stringByAppendingPathComponent:tf.text]
    stringByAppendingPathExtension:@"dudeldoc"];
  if ([[FileList sharedFileList].allFiles containsObject:self.changedFilename]) {
    textLabel.text =
      @"A file with that name already exists! Please enter a different file name.";
  } else {
    [[FileList sharedFileList] renameFile:self.originalFilename
      to:self.changedFilename];
    [delegate fileRenameViewController:self didRename:originalFilename
      to:changedFilename];
  }
}
- (BOOL)textFieldShouldReturn:(UITextField *)tf {
  [tf endEditing:YES];
  return YES;
}
@end
Now let's set up DudelViewController to use the new renaming mechanism. Starting in the header, add this:
#import "FileRenameViewController.h"
Then add a protocol to the list of protocols our controller implements:
@interface DudelViewController : UIViewController <ToolDelegate, DudelViewDelegate,
  MFMailComposeViewControllerDelegate, UIPopoverControllerDelegate,
  FileRenameViewControllerDelegate> {
Switch to the .m file, and fill in this method's body:
- (void)renameCurrentDocument {
  FileRenameViewController *controller = [[[FileRenameViewController alloc]
      initWithNibName:@"FileRenameViewController" bundle:nil] autorelease];
  controller.delegate = self;
  controller.modalPresentationStyle = UIModalPresentationFormSheet;
  controller.originalFilename = [FileList sharedFileList].currentFile;
  [self presentModalViewController:controller animated:YES];
}
Finally, implement the delegate method that gets called when the view's modal session is done:
- (void)fileRenameViewController:(FileRenameViewController *)c
  didRename:(NSString *)oldFilename to:(NSString *)newFilename {
  [self dismissModalViewControllerAnimated:YES];
}
Now build and run your app. You should be able to select a file in the list, and rename it using the Rename this Dudel menu item, as shown in Figure 5.